


Most nutrient problems don't get missed because nobody noticed them. They get missed because the loop between "we think something's off" and "product is applied" is too slow, too fuzzy, or breaks down at a handoff. A scout flags yellowing at V6. The sample sits in a truck for two days. The lab result lands in an inbox nobody's watching. By the time someone decides on a rate, the corn is at V10 and the economic return on that nitrogen has quietly dropped by half.
That's the real enemy — not diagnostic accuracy, but turnaround. This post lays out a rapid operational loop: how crews pull samples, what thresholds trigger action at each growth stage, how fast each step should move, and the QA checks that keep you from spraying based on a bad sample. The whole point is to compress the gap between detection and correction so your in‑season nutrient correction workflow finishes before the crop moves past the stage where the fix actually pays.
Why nutrient corrections stall (it's almost never the agronomy)
The agronomy part is mostly solved. Tissue test comes back low on potassium, you know roughly what to do. The failure lives in the operational seams:
-
The sample gets pulled but nobody logs which management zone or growth stage it represents, so the result is hard to act on.
-
Results come back but there's no clear owner for the "so what" decision — everyone assumes the agronomist or the manager has it covered.
-
The correction gets approved but the applicator is booked three days out, and nobody flagged it as time‑sensitive.
This usually happens when sampling, lab coordination, and application scheduling live in three different heads and zero shared systems. Each step is fine on its own. The handoffs are where days leak out.
A pattern worth noticing: farms that fix nutrient issues fast aren't the ones with the best labs. They're the ones with the shortest, clearest decision rules and a crew that knows exactly what to do the moment a symptom shows up. Speed comes from removing ambiguity, not from working harder.
The phone/crew sampling protocol
Your crew is already in the field. The trick is making their sampling consistent enough that a lab result actually means something, and fast enough that the sample doesn't degrade or sit in a truck all week.
Take control of your farm’s productivity.
Feldsly helps you plan, track, and optimize every farming operation with precision.
- Centralized crop scheduling
- Resource & labor management
- Real-time weather alerts
No credit card required
Keep the field protocol dead simple. Every sampling event captures the same five things, from a phone, before the truck leaves:
-
Field + management zone ID (use the same zone map your applicator uses — no free‑text descriptions).
-
Growth stage (V‑stage or R‑stage, not "kinda tasseling").
-
Symptom photo — one wide shot showing the pattern across the row, one close‑up of an affected leaf. Consistent photo standards matter more than people expect; if you want a deeper framework for that, the phone‑first crew observation approach covers capture discipline that translates directly here.
-
Sample type (tissue, soil, or both) and the tissue portion pulled — for corn pre‑tassel that's usually the most recently collared leaf; post‑tassel it's the ear leaf. Mixing portions wrecks comparability.
-
Timestamp + who pulled it.
Two rules that prevent most bad samples:
-
Pull from a representative composite, not the worst plant in the field. Crews naturally gravitate to the ugliest spot. That's useful for a symptom photo but terrible for a tissue average. Pull 15–20 plants across the zone.
-
Sample paired good/bad areas when you see a pattern. A tissue test from a struggling patch is nearly useless without a "healthy zone" reading from the same field for comparison. The comparison is what tells you if it's a real deficiency or just wet feet.
The photo isn't decoration. A wide shot showing whether the pattern follows the planter pass, the low ground, or is field‑wide often tells you more about the cause than the tissue number does — compaction and drainage mimic deficiencies constantly.
Stage‑specific decision thresholds
A lot of farms lose money by treating a "low" tissue reading the same at V4 as at R2. The economic value of a correction collapses as the plant ages, and some corrections at late stages are pure waste. Your thresholds have to be tied to stage, not just to the number.
The table below is a working example for corn nitrogen, potassium, and sulfur. Adjust the actual ppm/percent cutoffs to your lab's ranges and your soils — the point is the structure: sufficiency range, action threshold, and whether it's even worth correcting at that stage.
| Nutrient | Stage | Act if tissue below | Correction still pays? | Typical action |
|---|---|---|---|---|
| Nitrogen | V4–V8 | ~2.9% | Strong yes | Sidedress / Y‑drop UAN |
| Nitrogen | V10–VT | ~2.5% | Yes, shrinking | Y‑drop only, tighten rate |
| Nitrogen | R1+ | — | Rarely | Note for next year, don't chase |
| Potassium | V4–V8 | ~1.9% | Yes | Foliar bridge + soil plan |
| Potassium | V10+ | ~1.7% | Marginal | Foliar only, small ROI |
| Sulfur | V4–V10 | ~0.18% | Yes | AMS or ammonium thiosulfate |
The insight most people skip: a low reading late in the season is often better treated as a diagnostic for next year than a fire to put out now. Chasing R‑stage potassium with foliar product feels productive and usually returns pennies. Writing it into your fall soil plan returns real money. Knowing when not to correct is half the value of having thresholds at all.
Also worth flagging — thresholds should have a gray zone band, not a single cutoff. If a reading lands within roughly 5% of the action threshold, that's a re‑sample trigger, not an automatic application. Single borderline readings drive a lot of unnecessary passes.
Rapid amendment options, ranked by how fast they can actually go on
When a threshold trips, your available fixes aren't equal in speed. The fastest correction that clears the threshold usually wins in‑season, because ROI gets eaten by every day of delay.
-
Foliar micronutrient / bridge feeds — fastest, can piggyback on a fungicide or insecticide pass already scheduled. Limited by how much nutrient a leaf can actually take up, but great for buying time.
-
Y‑drop / coulter‑injected liquid N or S — fast if your applicator or high‑clearance rig is available, and stage‑appropriate well into vegetative growth.
-
Broadcast dry + activation rain — cheaper per unit but weather‑dependent; useless if there's no rain in the forecast, which makes it slow in practice.
-
Fertigation — very fast if you're already irrigating and the nutrient runs through your system. For irrigated ground this is often the quietest, cheapest rapid option people consistently underuse.
A practical move: for each field, pre‑decide your "first response" amendment before the season, based on what equipment and delivery you actually have on call. When a symptom shows up, you don't want to be researching product options — you want to already know that Field 7's default N rescue is Y‑drop UAN because the rig is available and the field is zoned for it.
If you're working with a constrained fertilizer budget and can't correct everything that trips a threshold, the correction list has to be prioritized by return, not by severity. The marginal‑response prioritization approach for stretching limited fertilizer pairs naturally with these thresholds — thresholds tell you what's deficient, marginal response tells you which deficiency to fund first.
QA checks so you're not applying based on a bad number
Fast is only good if it's not fast‑and‑wrong. A rushed correction based on a contaminated tissue sample or a mislabeled zone can cost more than the deficiency would have. Build these checks directly into the loop — they take minutes and prevent expensive mistakes:
-
Sanity‑check the reading against the symptom and the photo. If tissue says nitrogen is fine but the crew photographed classic firing on lower leaves following the low ground, something's off — likely a drainage or root issue, not a fertility one. Don't spray N into a drainage problem.
-
Confirm the good/bad comparison. If both your healthy and struggling zones read similar, the tissue difference isn't your cause. Re‑examine before spending.
-
Check the sample handling window. Tissue that sat in a hot cab for two days can give misleading numbers. Flag anything that sat too long as re‑sample, not act.
-
Verify zone ID matches the applicator's map. The single most common execution error is correcting the right nutrient in the wrong zone because the sample label and the prescription map didn't line up.
-
Two‑person sign‑off on any application over a set cost threshold. Cheap foliar passes don't need it. A five‑figure N rescue does.
Most bad corrections aren't diagnostic errors — they're identity errors. Right diagnosis, wrong field or wrong zone. A 30‑second zone‑match check catches almost all of them.
Turnaround expectations: put a clock on every step
Vague urgency is why loops stall. "As soon as possible" means different things to a scout, a lab, and an applicator. Assign an explicit target turnaround to each step and track when it's missed.
-
Symptom flagged → sample pulled same day (crew is already there).
-
Sample pulled → dropped at lab / shipped within 24 hours, refrigerated if held overnight.
-
Lab result → decision made within 24 hours of the result landing. This is the step that dies most often, so it needs a named owner.
-
Decision → application scheduled within 24 hours.
-
Scheduled → applied within 48 hours, weather permitting.
That's roughly a 4–6 day loop end to end for a standard lab. If you're using a same‑day or next‑day rush lab during critical windows, you can compress to 3–4 days. But the gain from a rush lab is only real if the decision step doesn't reabsorb the time you saved — which happens constantly when nobody owns the "so what."
Here's a simple visual to keep the roles, time targets, and handoffs clear.
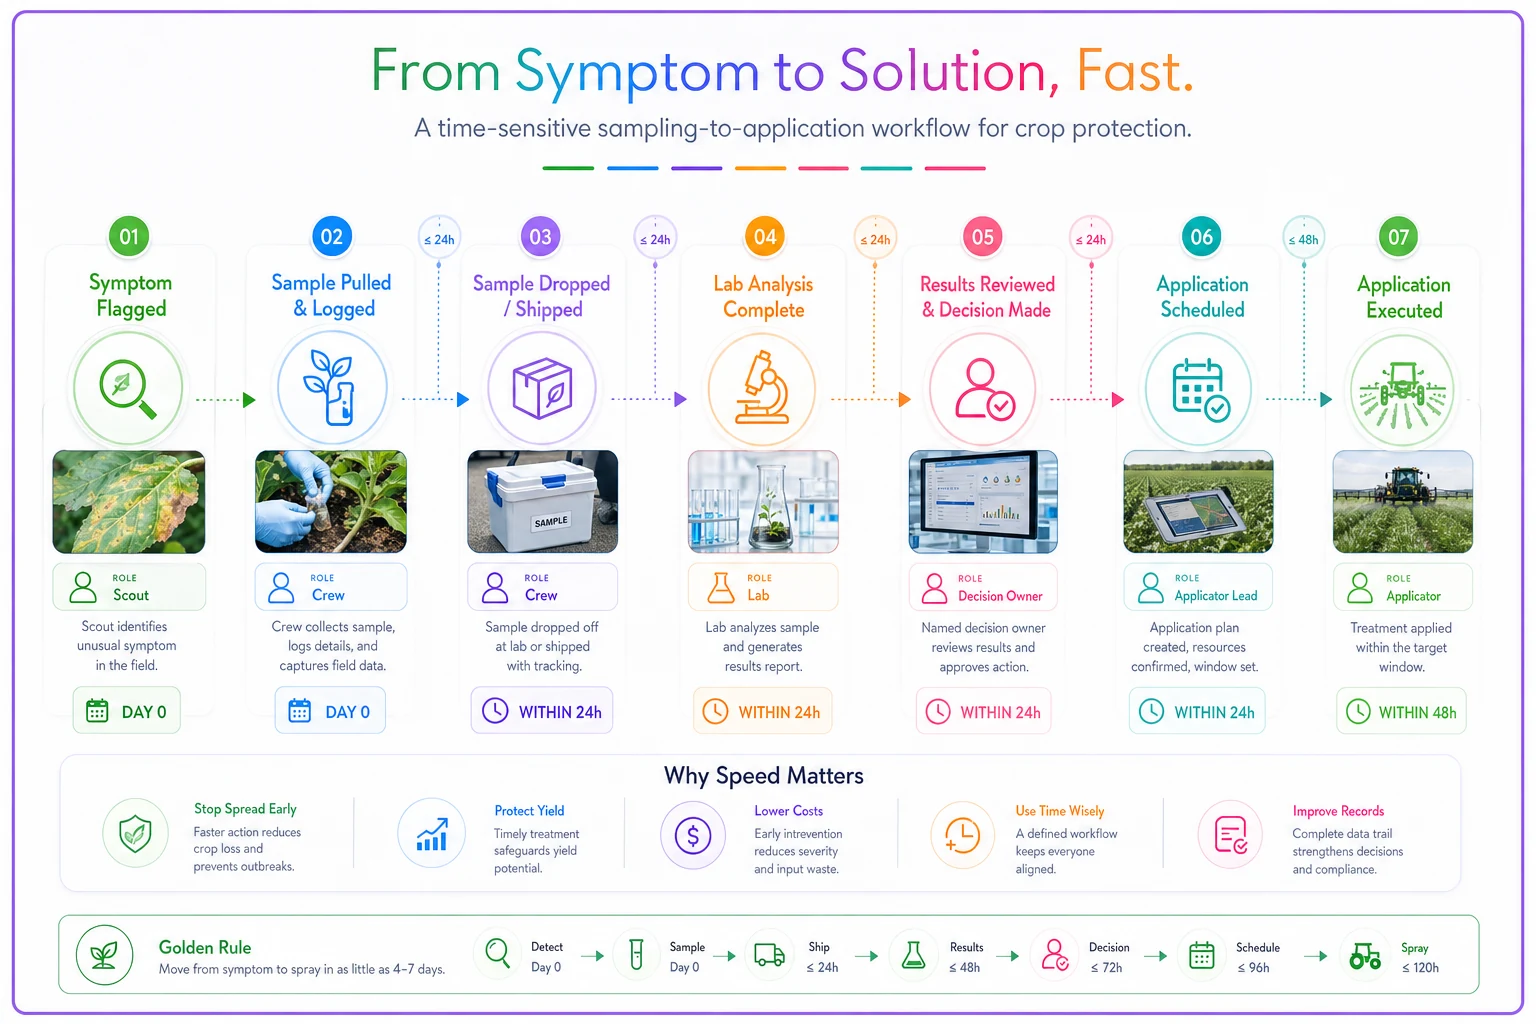
Shaving a day off the lab does nothing if the result sits unread for two days. Attack the slowest human step first. It's almost always the decision, not the science.
A worked example
The setup: A roughly 1,800‑acre corn and soybean operation, mostly rainfed with two irrigated pivots. Mid‑June, a scout flags a soybean field showing interveinal yellowing on newer growth in the sandier zone — a manganese pattern. Field is at early reproductive stage.
Old loop: Sample gets pulled, sits until the next town trip two days later. Result comes back showing low Mn four days after that. Manager sees the email a day later, debates whether it's worth a pass, finally books the sprayer — which is out on a fungicide run. Correction goes on eleven days after the symptom was first spotted, by which point the affected zone has already given up some pod set. Estimated loss on that zone: somewhere in the low thousands, and hard to fully recover at that stage.
Tight loop: Same symptom flagged. Crew pulls a paired good/bad tissue sample that same afternoon, logs the zone ID off the shared map, snaps the wide and close photos. Sample's at the lab by next morning with a rush flag. Result lands two days later; the named decision owner reviews it against the photo that same day, confirms the good/bad zones diverge (real deficiency, not a soil issue), and — because the field's "first response" was pre‑set as a foliar Mn bridge — schedules it onto the already‑planned fungicide pass. Correction goes on day four, folded into a trip the sprayer was making anyway. Marginal cost of the fix: mostly just the product, since the pass was happening regardless. Zone holds its yield.
The difference wasn't better agronomy. It was a pre‑decided response, a named decision owner, and a rush flag on the sample. Same diagnosis, one‑third the timeline, a fraction of the cost.
When a rapid loop is worth building — and when it isn't
When it makes sense: Irrigated ground, high‑value fields, sandy or variable soils prone to mid‑season swings, and any operation where you're already scouting regularly. The tighter your margins and the more responsive your soils, the more each saved day is worth.
When it's overkill: Uniform, high‑CEC soils that rarely surprise you, and fields where your fall soil program already reliably keeps nutrition in range. Building a 4‑day rush loop for a field that's never shown an in‑season deficiency is effort spent on a problem you don't have.
Who should skip most of this: If you don't yet have a shared, consistent zone map that your scouts and your applicator both use, fix that first. A fast loop built on inconsistent zone labels just helps you make the wrong application faster.
Keeping the loop from decaying
The hard part isn't setting this up once — it's keeping the turnaround targets honest across a busy season. Loops rot when nobody's watching the clock on the decision step.
What tends to help is a single shared place where a flagged symptom, its photos, the zone ID, the lab result, and the application status all live together — so anyone can see where a correction is stuck. Whether that's a shared spreadsheet with strict discipline or an operational platform that timestamps each handoff and pings the decision owner when a result's been sitting, the mechanism matters less than the habit: every nutrient issue has an owner, a clock, and a visible status until product is in the ground.
The farms that correct nutrient gaps fast aren't reacting harder. They've removed the guesswork from every step in advance — the sampling is standardized, the thresholds are stage‑aware, the first‑response amendment is pre‑decided, and someone owns the decision with a clock running. Build that once, and the next deficiency you find gets fixed while the fix still pays.
Ready to revolutionize your farm management?
Join 500+ farms using Feldsly to boost yields, reduce waste, and streamline daily farm workflows.