

The prescription file that came back from your agronomist is probably fine. The zones are reasonable, the rates make agronomic sense, and the ROI math on paper says you'll save fertilizer on your low‑response ground and push your high‑response ground harder. That part isn't usually where variable‑rate application falls apart.
Where it falls apart is the 40 minutes between the office computer and the first pass in the field — the data handoff, the controller setup, and whether anyone actually confirmed the machine is applying what the map says. A prescription is a plan. What lands on the ground is an execution problem, and execution is a crew problem.
This checklist is built for that specific gap. Not the agronomy. The execution. The stuff that turns a good VRA prescription into a good VRA pass, repeatably, even when your best operator is out and a fill‑in is running the sprayer.
Where VRA passes actually go wrong
Before getting into the checklist, it helps to understand the failure modes, because that's what the checklist is designed around. Botched VRA rollouts almost never fail in a dramatic way. They fail quietly. The rig runs all day, the tank empties on schedule, everything looks normal — and three weeks later you've got stripes in the field or a product‑used number that doesn't reconcile with what the prescription called for.
| Failure mode | What it looks like in the field | Why it happens |
|---|---|---|
| Wrong file loaded | Rig applies a flat rate or last year's Rx | USB swapped, similar filenames, no confirmation step |
| Controller default override | Machine applies target rate, ignores map | Section/rate control set to manual, nobody checked |
| Units/product mismatch | Rate off by a factor (lbs vs gal, N vs product) | Prescription built in one unit, controller set in another |
| GPS offset / implement width | Zones shifted, misapplied at boundaries | Antenna offset or implement width entered wrong |
| No as‑applied capture | Can't verify or reconcile after the fact | Logging turned off or card full |
| Silent flow drop | One boom section under‑applies | Partial clog, worn orifice, no live check |
Almost every one of these is invisible from the cab if nobody's specifically looking for it. The rig doesn't throw an error when it applies a flat 180 instead of a variable 140–210. It just runs. That's the whole problem with VRA execution — the machine is perfectly happy doing the wrong thing all day.
The data handoff: the first place things break
Most crews treat the file handoff as a non‑event. Someone exports the Rx, drops it on a USB or pushes it to the display, and that's that. But this is where a surprising share of misapplications actually start, and it's also the cheapest place to catch them.
Take control of your farm’s productivity.
Feldsly helps you plan, track, and optimize every farming operation with precision.
- Centralized crop scheduling
- Resource & labor management
- Real-time weather alerts
No credit card required
A clean handoff has three things:
-
One source, one name. The prescription file gets a name that includes field, product, and date — something like
NorthQuarterMAP0412. NotRxfinalv2_REAL.shp. When you've got four fields and three products loaded on one card, generic names are how the wrong file gets picked at 6 a.m. -
A written expected‑rate range. Whoever builds or receives the Rx writes down the min and max rate the map should produce. If the field should vary between roughly 130 and 210 lbs, that range travels with the file. The operator now has something to check the controller against instead of trusting the screen blindly.
-
A confirmed receipt. The person loading the display confirms the file is on the machine and opens correctly the day before, not the morning of. Corrupted files and wrong formats show up at the worst possible time otherwise.
The handoff fails most often not because the file is wrong, but because nobody defined who owns the confirmation. When it's "the agronomist sent it" and "the operator will load it," the confirmation step lives in the gap between two people and just doesn't happen. Assign it to one name.
Machine setup: the five checks before the first pass
Once the file is on the machine, setup is where the controller either honors the map or quietly ignores it. This is worth slowing down for, because a two‑minute check here saves a full field.
Run these in order, every field:
-
Rate control mode is set to the prescription/map, not manual or target. This is the single most common silent failure — the controller defaults to a flat target rate and the map just sits there unused.
-
Units match the prescription. Confirm the controller is expecting the same unit the Rx was built in. A prescription in lbs of product read as lbs of N is a 2–4x error that looks completely normal on the display.
-
Implement width and section setup match the actual rig. A width entered 30 inches off shifts every zone boundary and doubles your overlap error at headlands.
-
GPS/antenna offset is loaded and matches this machine. Swap tractors mid‑season and the last tractor's offset will misplace your zones by a few feet — enough to matter on tight management zones.
-
As‑applied logging is on and the card has room. No log means no verification and no reconciliation later. If you can't prove what you applied, you can't defend the VRA spend when you review it.
When swapping operators or machines mid‑day, require the incoming operator to initial the setup card so the checks actually get done.
One thing worth flagging: crews that swap operators or machines mid‑day skip these checks far more often than crews running the same person on the same rig all day. The handoff between people during the day is as risky as the file handoff in the morning. If your fill‑in operator jumps in after lunch, the five checks reset — they don't carry over from earlier in the day.
QA passes and test strips: prove it before you commit the field
Before committing to the full field, verify the machine is actually varying rate the way the map says. The simplest version is a test strip and a live‑rate watch.
Here's the process:
-
Pick a run that crosses at least two different rate zones — ideally a high zone and a low zone.
-
Watch the applied‑rate readout as you cross the boundary. It should change, and it should change to roughly the numbers your Rx said for those zones.
-
If the field varies between 130 and 210, and your display sits pinned at 170 the whole pass, something is wrong. The map isn't driving the controller.
-
On dry product, a quick catch test on a section or a look at the actual product draw‑down against expected gives you a second confirmation the flow matches the commanded rate.
The mistake is treating the first pass as production. It's not — it's the QA pass. Run it as a check, confirm the rate is moving with the zones, and only then settle into full application. Ten minutes of verified rate change on strip one is worth more than a clean‑looking day of applying the wrong thing.
One thing that trips people up: the display showing a varying number and the ground actually receiving a varying rate are two different things. A partially clogged section or a worn orifice can under‑apply while the controller still reports the commanded rate, because the controller thinks it's delivering. That's why the physical check — draw‑down, catch test, or a visual on section pressure — matters on top of the screen read. This same discipline pays off when you're trying to stretch a limited fertilizer supply across your best‑response ground — the savings only exist if the rate on the ground matches the plan.
Post‑application verification: close the loop or lose the lesson
The pass is done. Most crews call it there. But the VRA money only shows up if you close the loop, and closing the loop takes about five minutes per field.
Did what we applied match what we planned? Pull the as‑applied map and compare it to the prescription. You're not looking for perfection — you're looking for the shape. Do the high zones show high applied numbers and the low zones show low? Does total product used land near what the Rx projected? If the Rx called for roughly 4.2 tons across the field and you used 5.8, something didn't honor the map, and you want to know that today, not at harvest.
Where are the anomalies? Skips, doubled headlands, a section that under‑applied all day. Flag them now while you can still remember the conditions. These flags become your scouting list — misapplied zones are exactly the ground you want to watch for underperformance against your yield benchmarks instead of finding out cold at harvest.
The as‑applied file is only useful if someone actually looks at it within a day or two. Files that sit on cards until winter are archaeology, not verification. The value is in catching the misapplication while the season can still correct for it — a rescue pass, a note for the next application, an adjusted expectation on that field's yield.
Minimal‑tech gates: how to make this stick without a tech stack
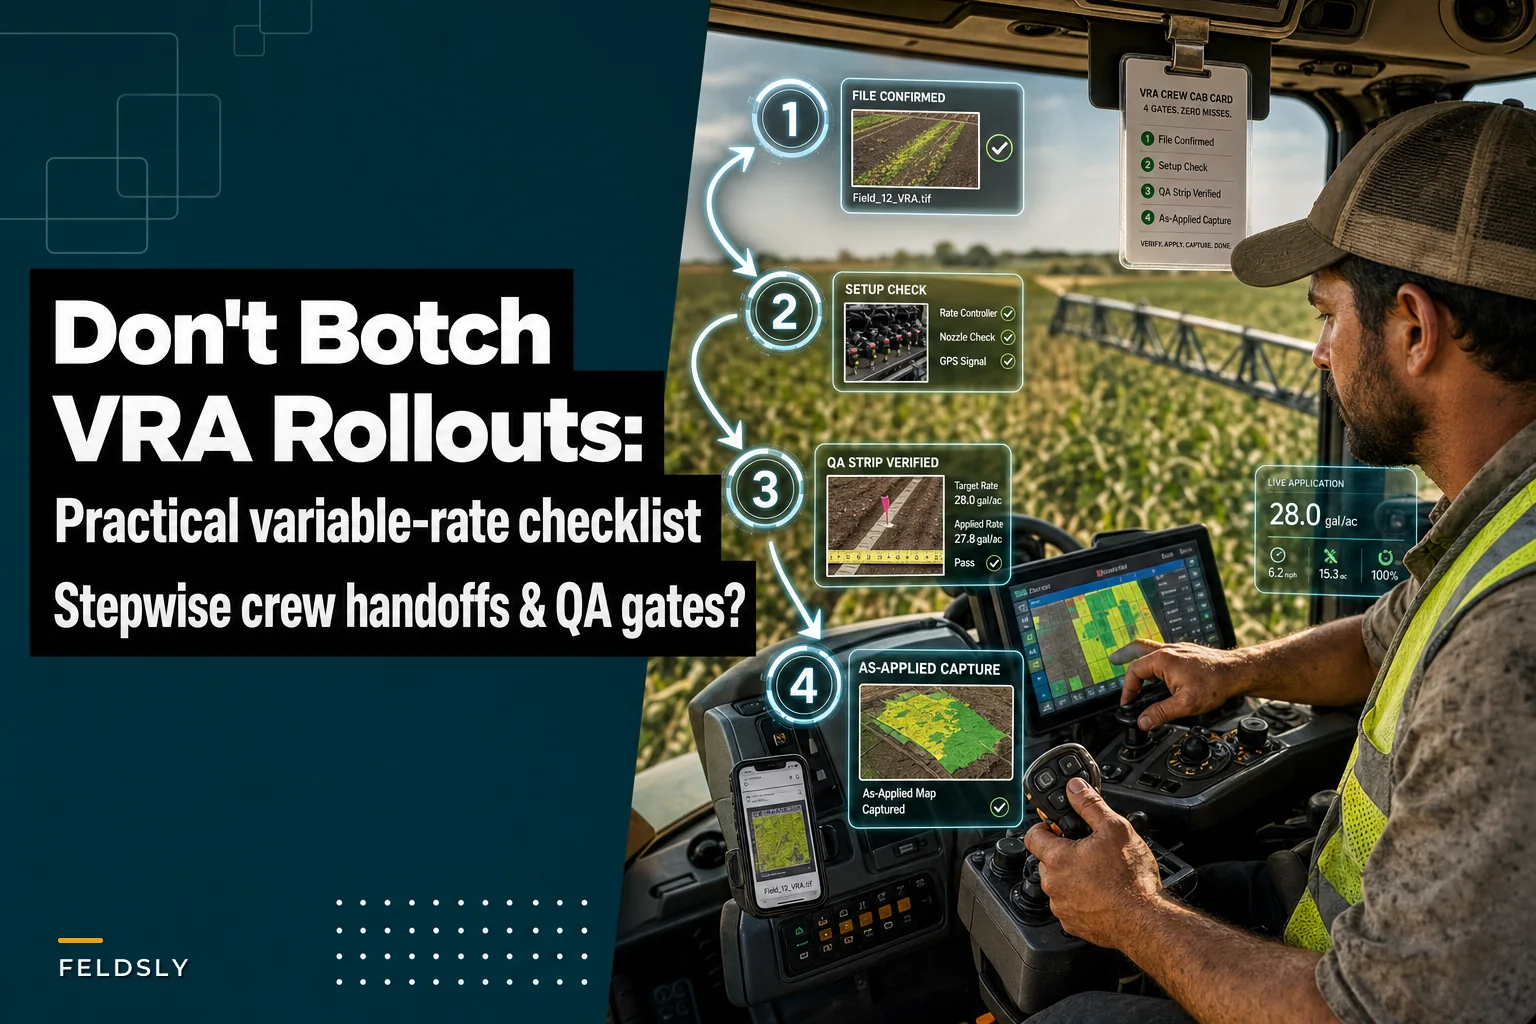
You don't need software to run this. You need gates — points where the pass literally cannot proceed until someone confirms a thing. The lowest‑tech version is a laminated card in the cab and a phone photo, and it catches most of the failures above.
A minimal‑tech gate sequence any crew can run:
-
Gate 1 — File confirmed (day before) Photo of the correct file open on the display. Text it to whoever owns the field.
-
Gate 2 — Setup confirmed (before first pass) The five setup checks initialed on a card. No initials, no start.
-
Gate 3 — QA strip confirmed (first pass) Photo of the display showing the rate changing across a zone boundary. This is the proof the map is driving the controller.
-
Gate 4 — As‑applied captured (end of field) Confirm the log saved and the card isn't full before moving to the next field.
The reason gates work better than a checklist you read once: a checklist is passive, a gate is a stop. When a fill‑in operator can't start until they've got initials on Gate 2, the check happens even on the busy days when everyone's rushing. VRA execution fails on the rushed days, not the calm ones, so your process has to hold up under pressure.
Here's a simple workflow visualization.
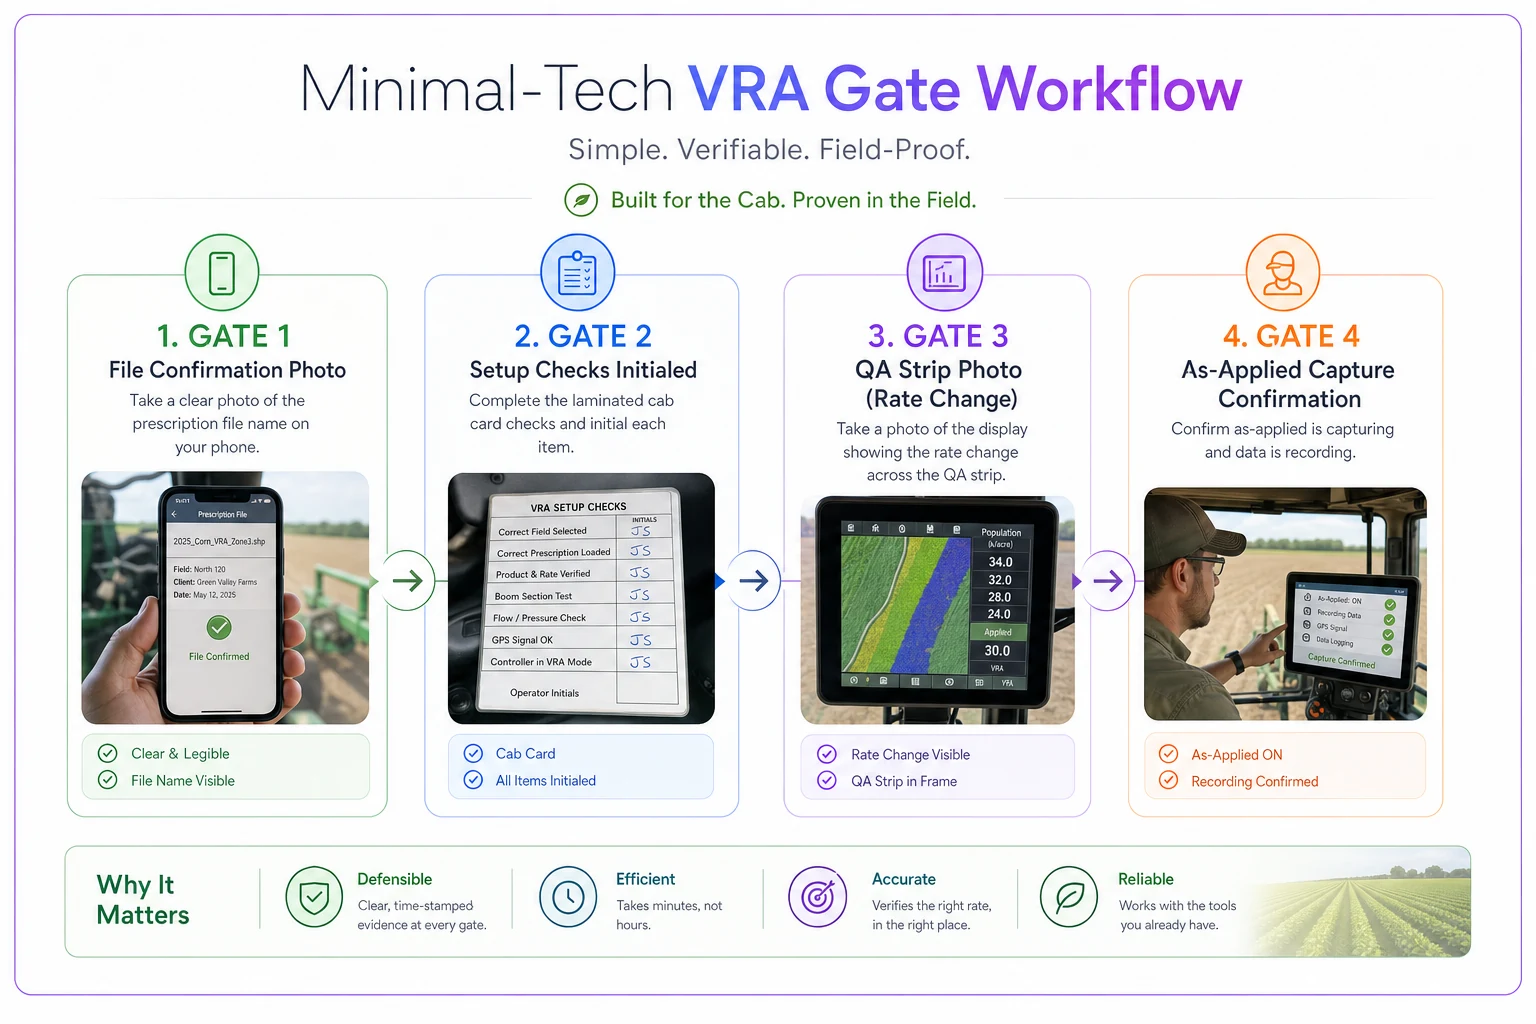
For larger operations a shared workflow platform can replace the card, but this visual shows the basic stop points any crew can run before scaling up.
A real scenario: 900 acres and a controller that never left flat rate
A mid‑size corn operation — around 900 acres of variable ground — rolled out VRA nitrogen for the first time. Prescriptions were solid, built to vary roughly 120 to 200 lbs by zone. Two rigs, two operators, one of them a seasonal fill‑in.
On the fill‑in's rig, the rate controller was set to manual target from a previous job and nobody reset it. It ran a flat 165 all day across three fields — about 260 acres — while the display cheerfully showed 165 and the map sat loaded and ignored. Nothing looked wrong. Tank emptied on schedule.
They only caught it because the other operator's as‑applied file showed clean rate variation and the fill‑in's showed a dead‑flat line. Comparing the two at the end of the week, the flat line jumped out immediately. By then the pass was down. The high‑response zones got roughly 35 lbs less than planned; the low zones got about 45 more than needed — so the operation both wasted product on ground that couldn't use it and short‑changed the ground that could. Ballpark waste and lost response landed somewhere in the $2,800–$3,600 range across those fields, and that's before any yield drag on the under‑fed zones.
The fix was almost embarrassingly cheap: a Gate 2 setup card that required "rate mode = MAP" initialed before the first pass, and a Gate 3 photo of the rate changing across a zone. The next application went out clean on both rigs. The lesson wasn't about the fill‑in operator — the operation just had no gate forcing the one check that would've caught it in two minutes.
When to slow this down — and when it's overkill
Not every application needs the full sequence, and pretending otherwise just gets the gates ignored.
Run the full gate sequence when:
-
It's your first VRA pass of the season, or the first with a new product or prescription source.
-
You're swapping operators or machines mid‑season.
-
The prescription has a wide rate range where a flat‑rate error would be expensive.
-
You've got fill‑in or seasonal crew running the rig.
You can lighten up when:
-
Same operator, same rig, same product, later passes in a proven season — the setup checks still run, but you're mostly confirming logging and doing a quick QA strip.
Don't bother with heavy verification if you're applying a flat rate anyway — then this whole checklist collapses to "load the right rate and log it." The gates exist because VRA's variation is exactly what makes silent errors invisible. Flat rate doesn't have that problem, so don't build process for a risk you don't have.
Bringing it together
The reason VRA rollouts get botched isn't bad prescriptions or bad operators. It's that the execution steps between the office and the ground live in the gaps between people, and nobody owns the confirmation. The machine will run the wrong thing all day without complaint, and you won't know until you compare the as‑applied map to the plan — if you ever do. Build the gates. File confirmed, setup confirmed, QA strip confirmed, as‑applied captured. Keep them low‑tech until scale forces something more, and make each one a stop instead of a suggestion. That's the difference between a VRA program that quietly leaks product and one that actually delivers the ROI the prescription promised.
Ready to revolutionize your farm management?
Join 500+ farms using Feldsly to boost yields, reduce waste, and streamline daily farm workflows.